10.21.2015

How to get to a file you just searched in Spotlight (Yosemite)

One of the changes I did not like in Yosemite was when they removed right-clicking on search results in Spotlight. I used this feature to access Show in Finder so I could jump to the actual file in Finder without opening the file itself. If you miss this feature, you could still do it, but with more clicks.

Scroll down to the bottom of Spotlight results and double-click Show All in Finder at the bottom of the search results.

Show all in Finder


This will open a Finder search window where you can right-click and choose Show in Enclosing Folder.

Show in Enclosing Folder


3.17.2014

Turn off auto-spell in iMessage (Mavericks)

Mavericks's aggressive auto-correct could become annoying especially if you use iMessage. Here's how to turn it off for iMessage. After that, I'll show how to turn it off in general using System Preferences.

To turn off auto correct in iMessage: 


  1. Open iMessage and click on any existing chat thread.
  2. On the iMessage menu, click Edit > Spelling and Grammar.
  3. Uncheck "Check Spelling While Typing".
  4. Uncheck "Correct Spelling Automatically".


Somehow, Apple decided not to make auto spelling universally controlled in System Preferences. But you may have to turn that off, too. Here's how.


    To turn off auto correct in System Preferences: 

    1. Click the Apple icon and select System Preferences.
    2. Click Language and Region.
    3. Click the Keyboard Preferences button.
    4. Click the Text tab.
    5. Uncheck the "Correct spelling automatically" box.

    11.03.2013

    Macbook Air problems with Motorola cable modem (Surfboard 6580) - solved

    I've just solved a pesky problem with our Motorola cable modem (Surfboard SBG6580). For a month now, my Macbook Air's internet connection was giving me grief. The main symptom was the very slow loading of pages like Google. The browser kept telling me that it was still "Resolving hostname," which was puzzling because our internet provider actually uses Google DNS.

    The problem is an incompatibility between the firewall of the Motorola cable modem (DOCSIS 3.0 specifications) and the Macbook Air's built-in firewall. To solve it, you just turn off either firewall (that is, either turn off your Macbook's firewall or your cable modem's firewall).

    Caution though. Turning off the firewall on your cable modem may result to attacks from the internet. So you have to understand what's happening. Simply put, a firewall is a "shield" that makes it hard for external computers (ie., hackers) from getting inside your home network. You have two main options:

    • Option A. Turn off your Macbook Air's firewall. Go to System Preferences > Security & Privacy > click the lock icon (lower left corner) > enter your password > click Turn Off Firewall(Read Caveat, below.)
    • Option B. Turn off your Motorola cable modem's firewall. Login to your cable modem's admin page. You typically do this by opening your browser and typing the IP address of your cable modem (usually 192.168.0.1) at the URL box. Then type your admin username and password. Click Firewall on top of the page and choose "Off" in the dropdown labeled IPv4 Firewall Protection. Some also recommend unchecking IP Flood Detection, but it's up to you to do some tests whether this helps or not (I'm still testing mine as of this writing. So far my tests indicate that leaving it checked does not slow down my connection). Check the Motorola SB6580 User Guide here for more details. (Read Caveat, below.)

    Option A. Turn off your Macbook Air's firewall.

    Option B. Turn off your cable modem's firewall.

    CAVEAT

    Caveat for Option A. Turning off your Macbook's firewall makes your files and system vulnerable when you connect to another network (eg, in an internet cafe).

    Caveat for Option B. Turning off the firewall on your cable modem will make all computers and devices vulnerable to external attackers.

    Until Motorola or the DOCSIS specifications solve the conflict, this solution will have to do for me. Hope this solved your problem, too.

    * * *

    Behind the scenes. I nearly gave up on solving this problem since the real solution (that obscure Apple forum entry) didn't turn up in the usual searches. The initial keywords I used ("problems with Motorola 6580) led me to the wrong track that led me to the wild goose chase of checking signal strength and fixing cable connections.

    What finally gave me a breakthrough was the realization that the other network users (mostly Macbooks and a Windows machine) weren't experiencing the slowdown. This led me to a new track and restarted by searching for "Problems with Macbook Air and Motorola 6580" that finally led me to the solution from an obscure entry in the Apple community forums.

    This just goes to show that I need to constantly reexamine my assumptions. And that perseverance pays off, eventually. After surfing the internet and reading bulletin boards, I thought the problem was a weak signal coming from the cable provider OR a problem with the cabling. A long process of elimination with some experimenting eventually led me to a solution hidden in

    11.01.2013

    Neat Totoro decal for Macs

    Found this neat Totoro decal for sticking on a Macbook, available at Amazon for $1.99! Click the image to visit the store.


    8.15.2013

    How to delete passwords typed in wrong box

    Have you experienced this? In your rush to login, you mistakenly enter your password in the username box. And now your password is visible in the browser for other users to see. What do you do? Use this nifty trick you learned from MacSwitched.

    Password typed in wrong box
    Annoying mistake, ain't it? You can delete it without deleting your whole cache.


    Solution: In the drop down, hover your mouse over the erring item, then click Shift-fn-delete and voila! No more cached password in clear text.

    I used to have to delete my cache -- tedious and annoying. But now this trick saves the day!

    How to move iTunes music and playlists to another computer

    You just bought a new computer and now you want to move your iTunes music and playlists from the old computer to the new one.

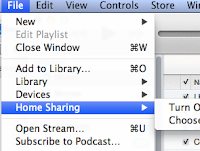
    Turning on Home Sharing
    Turning on Home Sharing
    This Apple support page contains several migration methods, but I prefer the Home Sharing option because it's easier (works for iTunes 9 and above -- mine is version 11).  If you have lower versions, manually moving the files may be better for you. Check out this apple support page: http://support.apple.com/kb/HT4527

    To do the Home Sharing method, just turn on Home Sharing on the old computer. Click File > Home Sharing. Enter your Apple ID.

    Go to your new computer, click Store > Authorize this computer. Enter the Apple ID you used in your old computer.

    Authorizing a computer in iTunes
    Authorizing a computer in iTunes
    Now turn on Home Sharing on your new computer. File > Home Sharing (use the same Apple ID you used earlier). Next, view the right bar of your new iTunes. Your old library should now show up. Click the arrow to expand the items. Click one of the songs in the main window and then click Edit > Select All. Then at the lower right window, click the Import button. This will import all songs to your new iTunes.

    Warning: This may take a while if you have an extensive collection and you're connected over slow wifi. 

    Exporting Libraries and Playlists
    Exporting Libraries and Playlists
    Lastly, transfer your playlists. In your old computer, click File > Library > Export Library. This outputs your library information into an XML file which you should save on your Desktop (to find it more quickly). Copy this file into your new computer using a thumb drive or by emailing to yourself (I used AirDrop since I had the feature on both Macs). Then, in your new computer's iTunes, click File > Library > Import Playlist.

    The good thing about this method is that it works, even if you've already put music into your new computer.

    1.16.2012

    Signing Electronic Documents with Preview (minimum: Lion)

    Scenario: You need to sign and send a contract quickly so your client could start processing your payment soon. Your client has told you it's okay for now to just scan the signed contract and email it to them, to further facilitate the processing. Now you could facilitate this even further through Preview and your built-in webcam (iSight).

    Before proceeding, you'll need the following:
    • A digital file of the contract, converted to PDF. 
    • Your signature on a clean sheet of paper. 

    The steps:
    1. In Preview, click Preview > Preferences > Signatures > Create Signature. Your iSight web camera will activate.
    2. Hold your signature up against the camera and position it along the blue line. 
    3. Click Accept if you're satisfied with the capture. Preview will even drop out the background, so you get a signature with a transparent background. You could paste this on your contract without worrying about covering the other text embedded in the PDF file.
    4. Open your PDF contract and click Annotate (ie, pencil icon) > Signature (ie, the italicized and underlined "S").  Choose the signature you just captured. 
    5. The Annotate and Signature icons
    6. Your cursor changes to crosshairs. Click at the point where you wish to insert your signature. Resize the signature to suit your taste, and that's it. 
    7. As a final step, I usually "flatten" this PDF to make sure that the signature is embedded into the document. Just click File > Print > PDF > Save as PDF. This will flatten the file and ensures that your signature is no longer just an annotation that could be deleted.


    1.08.2012

    Lion: Finally Available as USB Thumb Drive

    We've been betting on whether Apple would make Lion available outside of the App Store and if so, on what media. I bet on USB thumb drive and I was right.

    Here's the link for Apple Store (Philippines) and for Apple Store (US).

    'via Blog this'

    12.11.2011

    Sync problems between Nokia, Lion, iCloud and Google Calendar

    This is just a list of sync problems I get when I try to sync between my iCloud-based Calendars on a Macbook (Lion) and with my Nokia E51 phone. So far, I have not really found a good solution, so for now, I'm just making notes of my observations.

    Problems with iCloud:

    • Let's say I create an event called "Yoga" under my "Personal" calendar that is under iCloud in my Macbook Calendar. I can sync (push) this event to my Nokia E51 calendar. But the "Yoga" entry is marked as a "read-only" event in my Nokia calendar.
    • That means that although I can edit the "Yoga" entry to something like "Yoga revised" in my Nokia phone, the Mac will refuse to accept the edited entry and will issue a warning saying "Changing events in a read only calendar on the phone is not allowed...". 
    • In the next sync, iCloud will then overwrite the "Yoga revised" event in my phone with the original "Yoga" event from my iCloud calendar. Essentially, it ignored the edits I made on the Nokia phone and then overwrites my phone event with the old event -- frustrating. 
    This is a major annoyance for me because I often edit event entries in my Nokia calendar and sync these changes with my Calendar on the Macbook. If these edits keep getting ignored and overwritten by iCloud, then I'll be wasting time.

    My temporary solution has been to migrate all these iCloud calendars into local calendars. That is, I followed these steps:

    1. Export my iCloud calendars to a backup file (done one by one, unfortunately).
    2. Create new local calendars under the "On My Mac" category of Calendar.
    3. Import the calendars one by one. 
    4. Turn off the iCloud calendars and use the new local calendars.
    I need to sync with Nokia and iCloud due to two factors. First, for iCloud, because this allows me to share my calendars with my wife, who's using iCloud on an iPad. Second, with my Nokia phone, because I carry this around most of the time and use it as my mobile calendar. 

    Problems with Google Calendar (aka gCal):

    Another approach I've explored is to create a Google Calendar, import my Mac Calendar there and then share it back to my Mac via a weblink. This experiment resulted to almost the same results. That is, the event created in gCal is marked as a read-only event when it gets pushed to my Nokia calendar. The only difference I've noted so far is that on the next sync, gCal does not overwrite the event I edited (unlike in iCloud).

    If you have a free, alternative solution, please post a comment. I used Plaxo before, but I'm trying to avoid that. GCaldaemon is not really easy to use and I haven't revisited Calgoo (which used to be buggy and slow).


    11.11.2011

    How to cycle through browser tabs

    I've been searching for the keyboard shortcut that would allow me to cycle through the tabs of my browser. It turns out it's simple: Command + alt + left/right cursor key.

    If you've got several tabs open in your browser, try it now.

    This has got to be the shortest blog entry here. :)